Sending Documents in Amadeus
After completing installation and configuration, you can begin sending documents to your clients.
When you send out a document via Sertifi, you send the document in what's known as a Folder. A folder contains the signature document, reference document, and any payments added to the contract.
Sending Documents
To send a document in Amadeus:
Log in to Amadeus.
Select the booking for which you are sending a contract.
Click the Sertifi E-Sign button. The Sertifi Sending Wizard opens.
Complete the following fields:
Email Invite Message - enter the message you want your signers to see in the email they receive.
Expiration Date - the date when you want the document to expire. Select a date from the date picker.
Select how you want to add participants. Participants are the users that will be signing your document. You can add participants using either method listed below.
Click Add from Contact, click the magnifying glass icon
 and then select a participant from your Salesforce address book.
Click Add as Email Address to enter the email address of your participants that aren't currently in your Salesforce address book.
Click Add Participant.
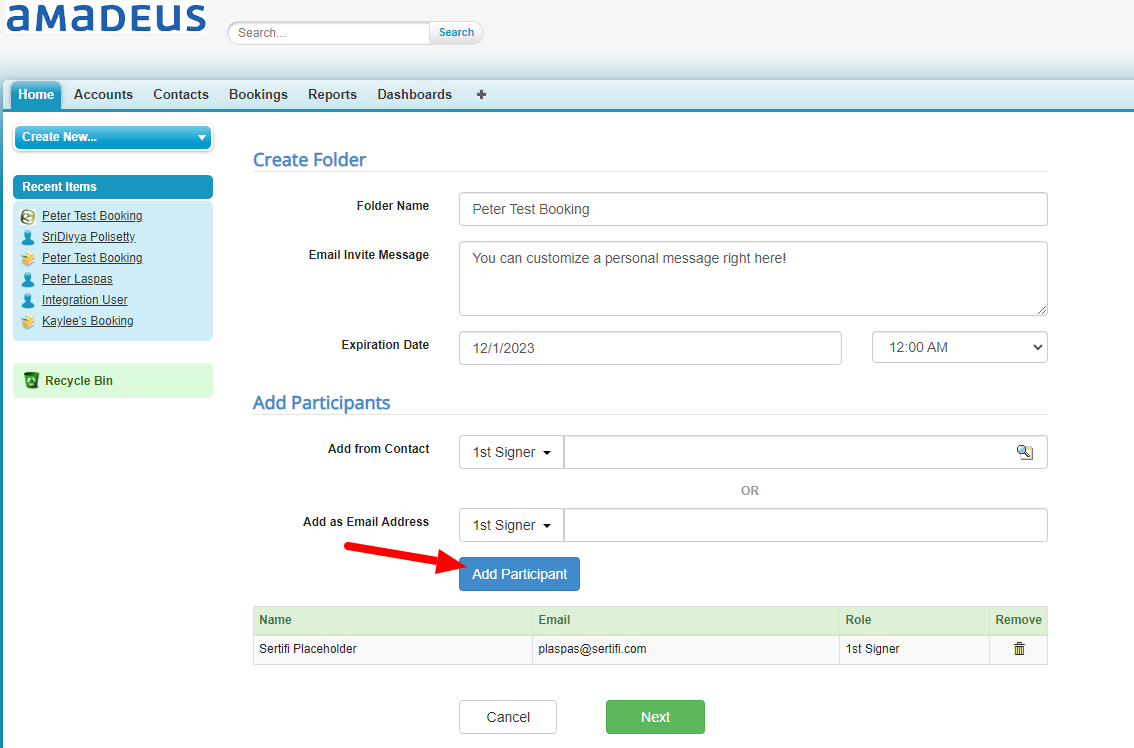
Optional – Select the next level signer (from 2–10) from the dropdown, and enter in all the participants you need. You can add multiple participants at each signer level, so if you need two 1st-level signers, you can add them both as 1st signer.
Caution
If you add multiple signer levels to your folder, note that each group after the 1st level can't sign the document until the signers before them complete the signature process. For example, a second signer can't sign a document until all 1st-level signers sign and submit the document.
Optional – Select Carbon Copy from the drop-down to add a Carbon Copy participant to the file. Carbon Copy participants can view the files, but not sign them.
Click Next. The Add Documents and Add Payments page appears.
Select from the following locations to add your signature document.
Hard Drive - browse on your machine to locate the signature document.
Salesforce Folder - select a document from your preexisting Salesforce folders.
Related Notes and Attachments - select a signing or reference document to provide more information to your signers.
Note: your signature document must be 4MB or smaller
Optional – Preview or Prefill your document. For more information, refer to the Document Editor guide.
Optional – If you use Sertifi Payments with Amadeus, you can add a Payment or Authorization by completing the following fields:
Description - add a title for the payment. This name is viewable by your clients.
Type - select Payment or Authorization.
Amount - enter the amount of the payment.
Date Due - enter the date the payment is due.
Surcharge this payment - enable this checkbox to apply a surcharge. See more about Surcharging.
Click Add Payment to add the payment.
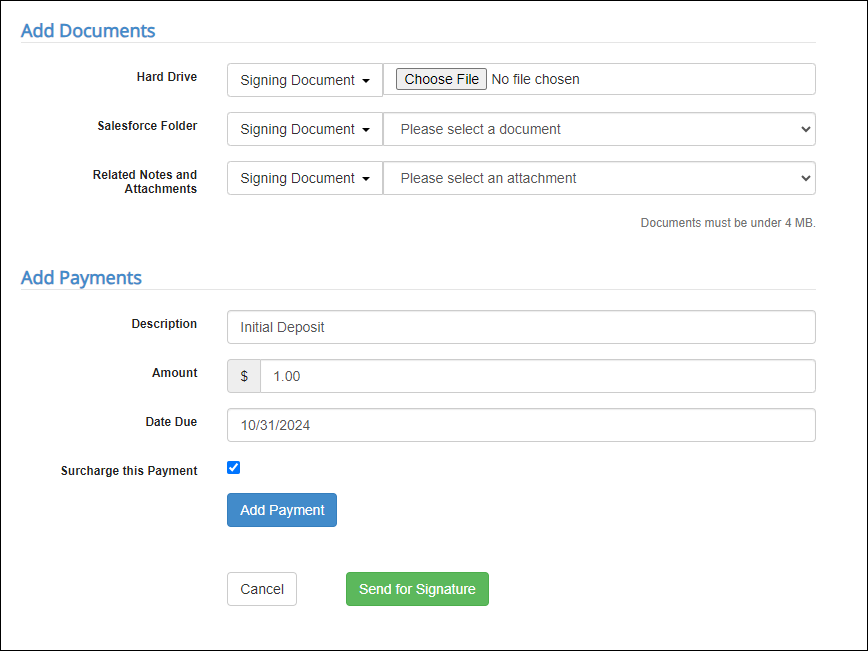
Optional - To create multiple payments, repeat step 12.
Click Send for Signature. Your document is sent to your signers for signature.
Reviewing Document Status

Once your signer receives your signature document and signs it, the Sertifi E-Contact tab updates with the following information:
File name – the name of the booking.
Created date – the date on which the client made the booking request.
Open – the number file rooms open with a document sent to a client.
Partially Signed – the number of documents partially-signed.
Signed – the number of documents completely signed.
Unpaid –the number of unpaid payments for the booking.
Paid – the number of payments paid for the booking.
Authorized – the number of payments authorized for the booking. This column appears when you send a payment authorization.