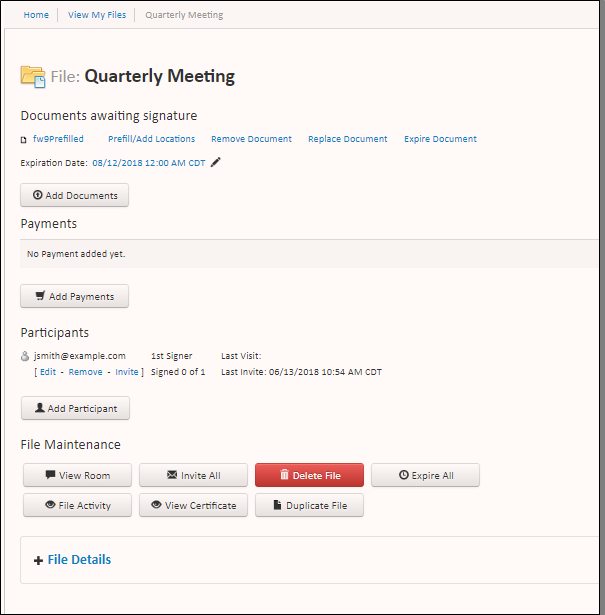
Folder Maintenance
Admin-level users can perform folder maintenance activities in your Sertifi portal. File maintenance activities include:
To view the Folder Maintenance page, navigate to View Files from the home screen of the Sertifi portal. Find the folder you wish to review, and then click on the folder name.
Tip
Accounts assigned to User roles cannot view folder maintenance information. Admins (and higher roles) can only view files they have uploaded to their own portals. Auditors, Power Admins, and Super Admins can view any and all files uploaded to a portal. For more information, see Sertifi Roles.

Review documents
When you access the Folder maintenance page, you'll see either your documents awaiting signature, or documents that have already been signed.
You can see documents awaiting signature if the document hasn't been signed yet or if you chose to invite signers to the document after it was initially sent. If the documents are still awaiting signature, there are a few actions you can take on the document:
Prefill/Add Locations either prefills forms on the document, or adds Sertifi Data Fields to it. For more information on Data Fields, refer to our guide.
Remove Document removes a document from the folder. When you click Remove Document, a warning appears. Click OK to remove the document, or click Cancel.
Replace Document replaces the current document with a new one. When you click Replace Document, the Replace Document screen appears. Enter a title for the replacement, and then click Choose File. Navigate to the new document, select it, and then click Replace Document.
Expire Document expires the document. When you click Expire Document, the document is expired and can no longer receive a signature. To undo this action, click Un-Expire.
Add Documents adds documents to the folder. When you click Add Documents, your document library opens. When the document library opens, select or upload as many additional documents as you want to add to the folder, and then click Done.
Expiration Date edits the expiration date and expiration time of the document, if the document is still awaiting signature. Click the pencil icon next to Expiration Date and update the date and time.
Note
If a document has already been signed, the document will appear at the top of the Folder Maintenance page, with the date and time that the document received the signatures.
Caution
Signed documents cannot be edited or replaced. If updates are needed, a new document must be sent for signature.
Edit, remove, or invite participants
In the Participants section of the Folder Maintenance page, you can edit, remove, or invite participants to a folder. You can also see their signer level, the date and time they last visited the document, and the date and time of the most recent invitation to sign that was sent to them.
Add Participant adds more participants to the folder.
Edit enables you to change the email address of any signers for the folder.
Remove removes a participant from the folder.
Invite lets you send, or re-send, invitations to a participant.
Caution
Participants can only be removed if there's more than one participant in a folder. If a folder only contains one participant, you will only be able to edit their name and email address.
Manage Files & Folders
The File Maintenance section lets you manage and update files and folders.
View Room enables you to view the Signing Room for the file. From here, you can see the status of your documents or authorization forms, along with any questions or comments posted by your participants.
Invite All adds a message to the stream for your participants to see.
Delete File deletes the file.
Expire All expires all documents, payments, or authorizations associated with the file.
File Activity shows a list of all file activities. From here, you can either navigate back to the File Maintenance screen, or click Download Certificate to download a PDF certificate containing a full summary of file activities.
View Certificate displays a PDF certificate containing a full summary of file activities.
Duplicate File sends a signature request to multiple users. Each signer will receive a copy of the document to sign, and each signer's signed version of the document is returned to your portal as an individual PDF. To perform this action, enter the email addresses you want to add, and then click Create Files.
Inspect File Details
The File Details section provides additional information about the file. Click the plus sign (+) to expand the file details and view the settings associated with the file. These settings are pulled directly from your default system settings, along with any other individual settings set by a Super Admin.