Configure or Edit Real Time Updates
If you're a Sertifi Super Admin for your portal, you can update and make changes to your Real Time Updates settings. Real Time Updates apply for your portal if you're using the Sertifi for Salesforce app or the Sertifi Opera Integration.
As a Super Admin, you can edit and update:
Subscription Web Services
Real Time Updates
You can access these account settings through the portal by clicking Administration > Account Settings > Real Time Updates.
For API documentation, refer to the Sertifi API Developer center.
Subscription Web Services
The Subscription Web Services section of the Real Time Updates settings lets you see the various events that occur in your portal that you can use to update any external or custom systems.
Service and Data Definitions
The Service and Data Definitions section contains the files you need to set up API calls and to view the web service push queue.
The WSDL file shows the definitions of what you need to call and/or send for Sertifi to work with your custom system in XML format and specifies the notifications and parameters that Sertifi passes.
The document database schema file is more documentation that's related to the WSDL file.
The Web Service push queue shows a list of the events that get pushed to your custom system, Salesforce, or Opera.
Settings
The Settings section of the Subscription Web Services is where you enter the URL of your API, and then enter your user name and password for your API. You can leave these fields empty, but it's better to include security tokens to protect your API.
The table below, which can be found in the Settings section, shows the category, event, description, subscription, and field selection of each event in the Sertifi system.
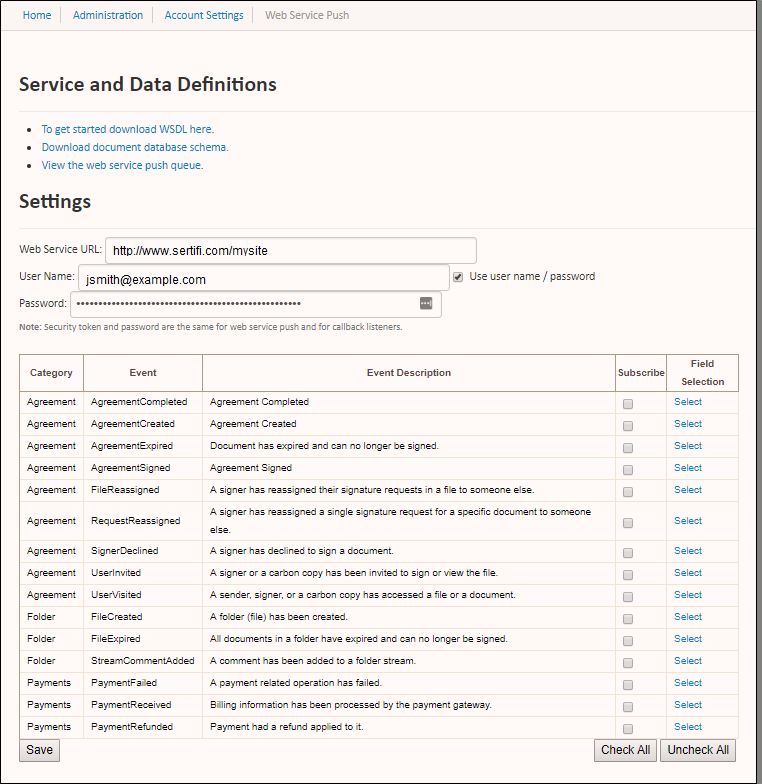
To subscribe to these events:
Select the checkbox in the Subscribe column for the event you want to receive notifications about.
Click Select under Field Selection. The Field Selection window opens.
Select each field related to the specific event that you want included in your notification. For example, if you want to know the Document ID for each document sent in Sertifi, you would select the checkbox in the Use column next to Document ID in the field popup.
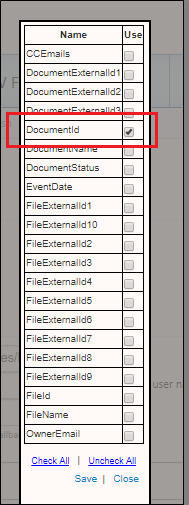
Click Save. The window closes.
Click Save to save your changes.
Web Service Push Queue
The Web Service Push Queue applies for Salesforce customers, Opera customers, and customers using a custom system. When you click this link, the queue opens and shows the following information:
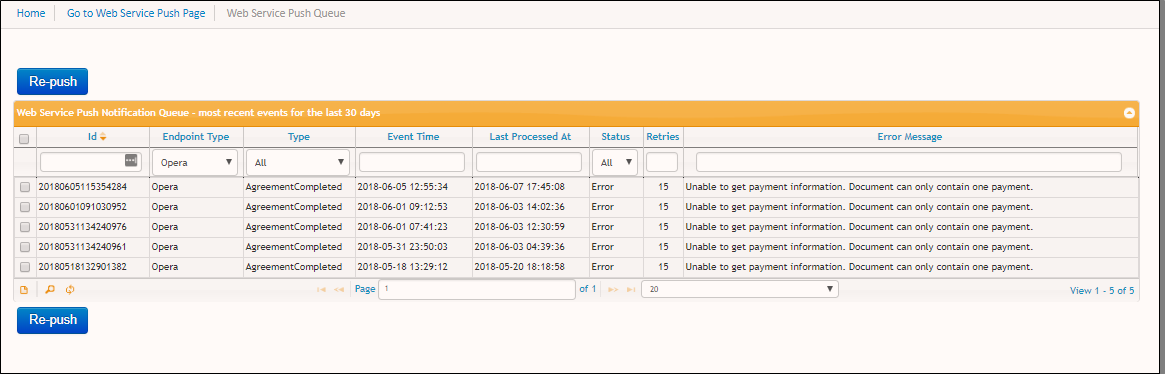
ID - an identification number applied to the push event.
Endpoint type - the endpoint where you expect to see the events, for example, Salesforce.
Type - the name of the type of the event.
Event time - the date and time the event occurred.
Last Processed At - the date and time the event was processed.
Status - either Error or Complete signifying an unsuccessful or successful push.
Retries - the amount of times the system has retried pushing the information.
Error message - the error message associated with an unsuccessful push.
You can filter the queue by any of these fields to see the information you want. You can also re-push any events by selecting the event, and then clicking Re-push.
Real Time Updates
Real Time Updates apply for Salesforce customers only. You must enable this setting if you want your Sertifi portal to push all the events to your Salesforce account. To do this, select Salesforce Oauth2 from the dropdown.
Enter the following Salesforce Oauth Settings:
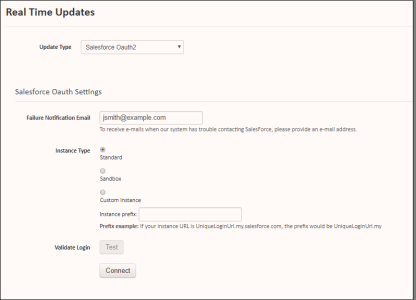
Failure Notification Email - enter an email address where you want Salesforce connection notifications to be sent.
Instance type - select the instance type where you want to push Salesforce events:
Standard - select this option if you want to push events to a production org.
Sandbox - select this option if you want to push events to a sandbox org.
Custom Instance - select this option if you have a custom instance of Salesforce. You must also enter your Salesforce prefix.
When you're finished, click Connect, and then enter your Salesforce credentials. You successfully enabled real time updates.